
Lens Main Functions:
What is more important to get a good picture, the Lens or the Body?
Many would say the Body, which is not necessarily wrong, but a good lens will always produce good pictures even if it is mounted on a not so good body camera. So then maybe it is better to use a good lens and to start building the complete remaining systems around it.
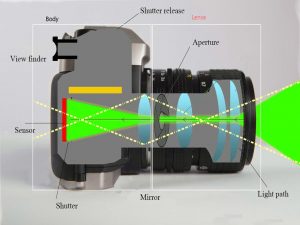
To get an overview of how a lens is working together with the camera body check the animation from previous post
Main Functions of a Lens are:
- Focus: A camera lens is having more optical glass lenses inside, perfectly shaped and organised in groups. All these lenses and groups are working together in order to conduct the beam of light and to create a sharp image projection on the sensor. A camera lens is good if it manages to project a sharp image across the complete image. Regular lenses produce sharp images just in the center of the image and not at the edges of the image.
- Aperture: aperture defines how much light passes through the lens.
- Focal length: on top of sharpness, another characteristic of camera lenses is focal distance or focal length. A focal distance basically defines how much from a scene can be captured by the lens, a wide area of the scene or a small area of a scene.
Again let’s take them one by one in details:
1. Focus of a Lens:
What means Focus when it comes to a lens:
As I mentioned before, the beam of light is passing through some optical lenses inside the camera lens.

The last lens or group of lenses that is facing the sensor is responsible for converging the streams of light,coming from different angle, exactly on sensor as seen in previous picture. When this happens then we have a sharp and in focus picture as a result. When this condition is meet partially then we can say that we are out of focus, as seen below:
In this picture the converging point is behind the sensor:

and in this picture below the converging point is in front of the sensor.
In both cases the result picture will be not sharp, also called a blurry picture.
If the converging point is not directly on the sensor, this can be corrected by moving back or forward the lenses/group of lenses facing the sensor. This movement is called focusing. From this point of view we can have already a classification of the camera lense based on focus type:
- Manual-Focus: in this case the movement of the lens is triggered manually by photographer rotating the focus ring in a direction or other based on lens producer.
- Auto-Focus: in this case there is a motor that trigger the lenses movement in order to achieve the sharp projection of the image on the sensor. In this case the camera software, using different algorithms, gives inputs to the motor that moves the optical lens till focus is achieved.
The overall focus quality is based on 3 inputs:
Aperture setting,that will be covered next section
Distance between camera and object in the scene – it can happen that one object is in focus but other objects that are closer or further away from the camera are not in focus – imagine a portret where the model face is clear and sharp but objects in front of the model or behind are blurry.
Distance between the objects in the scene – this is more or less same as previous points but distance relation is not between camera and objects rather between objects.
Nowadays cameras have pretty good software algorithms that lead to very good focusing when Auto-Focus is ON, but it can happen, depending of what king of photography you want to do, that Auto-Focus can’t achieve perfect focusing.
My prefered way of focusing is to combine the Auto-Focus with Manual-Focus, when possible – meaning, let the camera to do it’s best with Auto-Focus ON and then perform fine focus tunings using the camera digital display – this technique will be covered more in details in future lessons.
When Auto-Focus is ON the camera software is trying to analyze the image by searching areas in the picture/frame where big differences between light and dark object exists. If such areas can not be found, for example you try to focus on a 100% white/grey wall or maybe during the night when is complete dark outside while trying to photograph the sky or maybe when using a neutral density filter on the lens, then the camera can not focus properly, so in such situations only Manual-Focus can help to achieve a sharp picture.
The switch between Manual-Focus and Auto-Focus can be found generally on camera, indicated as MF or AF, but also the switch can be placed on the lens indicated in the same way.
2. Aperture of a Lens:
What means Aperture when it comes to a lens:
The Aperture is the pupil of the Lens.
In simple words Aperture it is a hole in the lens that lets the light to pass through and reach the sensor as described before. Depending of the hole diameter more or less light is passing through. Position of Aperture inside the lens can be seen in previous pictures.
Big diameter = big hole = more light passing
Small diameter = small hole = less light passing…easy as that.
Now this big/small hole diameter is translated in something called F-stop. This number is in very close relation with Focal length – that will be covered in details in next paragraph.
F-stop number is equal with Focal_Lenght (mm) divided by the diameter hole (Aperture, mm)
F-stop = Focal_Length(mm)/Aperture diameter (mm)
Example 1: Focal_Lenght = 100 mm and F-stop = 2 => Aperture diameter = 50 mm (100/2=50)
Example 2: Focal_Lenght = 100 mm and F-stop = 4 => Aperture diameter = 25 mm (100/4=25)
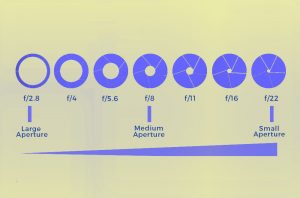
As you can see, for the same lens (same focal length ) bigger the F-stop number is, smaller the Aperture is.
A graphical representation between F-stop and hole diameter is in the next picture:
You do not need to perform such calculation each time before pressing the button to take a picture but it is important to understand what is the relation between F-stop and Focal_Length as this two are the inputs for the camera setup.
Depending on the lens type and market, this F-stop number can start from F/1.2 (big Aperture diameter = more light passing) and usually goes up for F/22 (small Aperture diameter = small light passing).
So depending on the photographing conditions, let’s say low ambient light (night, concerts,.. ) you might want a lens capable to work at low F-stop numbers e.g. F/1.4, F/1.8 , also called fast lens, but they are also more expensive 🙂
In case of zoom lenses it might happen that F-stop number is not constant across the complete zooming range;
Let me explain: considering a lens with variable focal length 18-200mm, in this case F-stop can be F/3.5-5.6 meaning at 18mm focal length lowest F-stop number is 3.5 but at 200mm lowest F-stop number is 5.6. This is because of len design, if you would like to have low F-stop number at high focal length the result will be a very fat and heavy lense – also very expensive.
3. Focal Length of a Lens:
Two of the most important criteria of selecting a lens are the Focal Length and Aperture capabilities. Aperture I have already describe, now let’s try to understand what exactly means Focal Length.

As you can see in previous picture there is a border of the light beam ( dotted yellow lines ) which defines the extremities of the scene that is going to be captured.
Intersection of the lines of light corresponding to the edge of the beam defines something that is called nodal point.
The distance between camera sensor and this nodal point it’s called Focal Length, highlighted in previous picture as an example of 35mm.
The closer this point is to the camera sensor the wider is the field of view – then we are talking about wide angle lens (e.g 14mm, 20mm ). Big distance between camera sensor and nodal point creates small (or narrow) field of view – then we are talking about telephoto lenses (e.g. 200mm, 400mm).
Lenses which have a fix Focal Length ,are called Prime Lenses.
They are done simple and provide very sharp pictures but photographers needs more flexibility so then the Zoom Lenses were made.
As it can be seen in next picture, Zoom Lenses provide variable distance between nodal point and camera sensor.

This is possible by moving some elements inside the lens closer or further away from the sensor as trigger coming from photographer by rotating the zoom ring.
To briefly conclude the discussion about lenses I would list main points below:
- Main purpose of a lens is to guide the light towards the camera sensor.
- They are responsible for a proper image focus on the sensor, and we have lenses with Manual-Focus or Automatic-Focus.
- They control the amount of light that is passing through by using of Aperture
- They control the how wide or narrow is the angle of view by the help of Focal Length. Based on this we can have Prime Lenses or Zoom Lenses.
Combining all this lens parameters together the amount possibilities to take pictures and to create different effects becomes infinite.
In future posts I will describe in details also other lens features and accessories, as optical stabilisation, mount types, markings, filter, lens hood, teleconverters, tilt lenses, distortion and aberration.
I hope you find this informative and will help you to have a quick and easy start in photography journey
My very Best Regards
Ioan
Edit like a PRO using below software:
